Deep Learning with “AWS Graviton2 + NVIDIA Tensor T4G” for as low as free* with CUDA 12.2
How Custom AMIs and Spot Instances can make Deep Learning pocket friendly on AWS Cloud

Seasoned technology leader with 17+ years of experience. Driving startup to industry leader. Committed to technical excellence, innovation, and community engagement for the advancement of technology and education.
* The “as low as free” tagline is based on
*g5g.xlarge*spot instance rates, which have been as low as $0.1519/hr.
Introduction
The world we live in today heavily relies on artificial intelligence. From vacuum bots to sales support, from self-driving cars to disease detection, from finding the content you want to consume to translating from a foreign language to your native one. AI is behind every great product out there, and the need for an efficient, cost-effective, and scalable deep learning architecture has never been more critical.
The G5g instances powered by Amazon’s own Graviton2 processor and also feature NVIDIA T4G Tensor Core GPUs are a cost-effective alternative to Intel’s and AMD’s powered instances for deploying deep learning applications.
The Dilemma
AWS offers robust, powerful, cost-effective architecture for running artificial intelligence and deep learning tasks. One of the advantages is the option to use spot instances, which are far more cost-effective at times and up to 70% cheaper than on-demand instances.
For example, the spot pricing history for the g5g.xlarge instance in various “us-east” zones ranged from $0.1720 to $0.1519 per hour for the past three months. These rates are tempting, but at the time of writing, no official Amazon Linux 2023 Deep learning AMI is available for the Amazon G5g instances family. Setting up the environment can be cumbersome: finding drivers, the correct dev toolchain, and a pre-compiled PyTorch module supporting the latest DL toolkit.
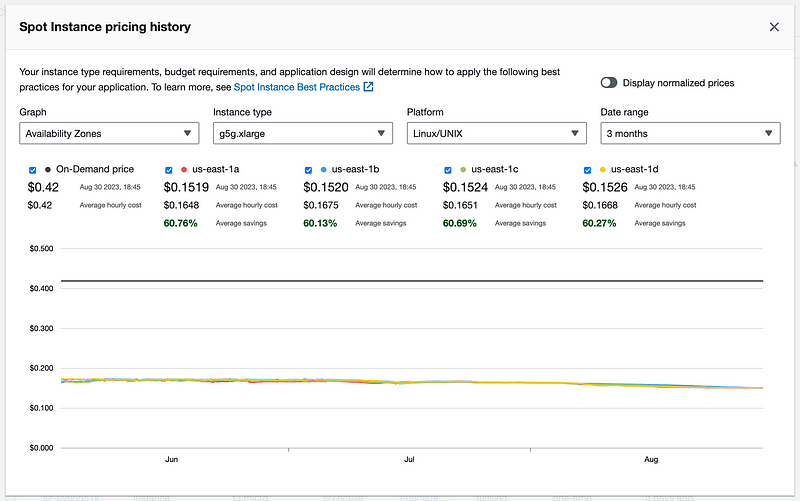
Spot price history for g5g.xlarge for the last three months.
Navigating the Challenge — A How-To Guide
This aims to bridge the gap by offering comprehensive step-by-step instructions suitable for newcomers and seasoned data scientists. The goal is to enable you to leverage these state-of-the-art technologies at a meager cost without the hassle of finding the right driver and packages for the G5g family. Eventually, we will compile all the individual steps into a single script that will further streamline the process.
1. Launching an Instance
For setting up an instance, we’ll use g5g.4xlarge instance. The idea behind using a more powerful instance is to accelerate compilation time. We will launch the build instance with the AWS Command Line Interface (aws cli).
First, set the following environment variables:
REGION: Specifies the AWS region, e.g., ‘us-east-1’.SECURITY_GROUPS: Your security group ID(s).KEY_PAIR: The name of your SSH key pair.SUBNET: The ID of your subnet.
If you have any confusion about these variables. You can refer to the security group, keypair, and subnets documentation.
Once you have these values, you can set these variables like this.
export REGION='us-east-1'
export SECURITY_GROUPS='YourFirstSecurityGroupIdsHere'
export KEY_PAIR='YourSSHKeyNameHere'
export SUBNET='YourSubnetHere'
Next, we need to find the latest Amazon Linux 2023 AMI ID so you will get the latest AMI every time you run this script. The following command will fetch the AMI ID and store it as AMI_ID.
Let’s launch the instance using the AMI ID we retrieved earlier by executing:
aws ec2 run-instances \
--image-id $AMI_ID \
--instance-type g5g.4xlarge \
--key-name $KEY_PAIR \
--subnet-id $SUBNET \
--security-group-ids $SECURITY_GROUPS \
--region $REGION \
--block-device-mappings '[{"DeviceName":"/dev/xvda","Ebs":{"VolumeSize":20,"VolumeType":"gp3"}}]' \
--tag-specifications 'ResourceType=instance,Tags=[{Key=Name,Value=AMI-Builder}]'
This command initiates a g5g.4xlarge instance with the Latest Amazon Linux 2023 AMI ID. It also configures the instance to use the specified security groups, key pair, and subnet we provided in environment variables. We’ve also attached 20 GB of storage to the root device for downloading different libraries and PyTorch compilation.
2. Installing System Updates and Required Packages
Setting up any machine, be it local or in the cloud, it is always a good practice to keep it updated. This part will install all the updates and tools used in compilation or running AI tasks.
But before going to Gung Ho, We recommend taking an overview of the guide first and checking the complete script at the end of this tutorial, which should save you from lots of trouble.
First, let’s define some essential environment variables.
CUDA_HOME=/usr/local/cuda
HOME_DIR=/home/ec2-user
Now, we’ll create a function called install_utils that carries out a series of tasks.
install_utils() {
    # Update all system packages to their latest versions
    dnf -y update

    # Install development tools, which include compilers and other utilities
    dnf -y groupinstall "Development Tools"

    # Install the packages that are specifically required for our setup
    dnf install -y openssl-devel cmake3 rust cargo
    dnf install -y amazon-efs-utils htop iotop yasm nasm jq python3-pip python-devel cronie cronie-anacron

    # Add necessary paths to the .bashrc file
    echo "PATH=$CUDA_HOME/bin:\$PATH" | sudo tee -a $HOME_DIR/.bashrc
    echo "LD_LIBRARY_PATH=$CUDA_HOME/lib64:\$LD_LIBRARY_PATH" | sudo tee -a $HOME_DIR/.bashrc

    # Configure shared libraries
    echo "/usr/local/lib" | sudo tee /etc/ld.so.conf.d/usr-local-lib.conf
    echo "/usr/local/lib64" | sudo tee -a /etc/ld.so.conf.d/usr-local-lib.conf
}
By running this install_utils function, you will have an updated OS and development tools needed in later steps.
3. Install Latest NVIDIA Drivers, CUDA 12.2 Toolkit, and Cuda Deep Neural Network library:
In this step, we will install the NVIDIA GPU driver, Latest CUDA 12.2 toolkit, and CUDA Deep Neural Network (CuDNN) libraries. This part uses the latest driver and toolkit released on August 29, 2023. If you read it later, you can update the URLs for the latest driver and libraries; everything else will be the same. Steps to find the latest driver, toolkit, and library are also mentioned below.
Install NVIDIA GPU Driver
To download and install the NVIDIA Tesla T4G driver, execute
wget https://us.download.nvidia.com/tesla/535.104.05/NVIDIA-Linux-aarch64-535.104.05.run
sh NVIDIA-Linux-aarch64-535.104.05.run --disable-nouveau --silent
If everything goes smooth; you should have a working NVIDIA driver by now, which can be checked by running the NVIDIA system management interface command nvidia-smi in the terminal.
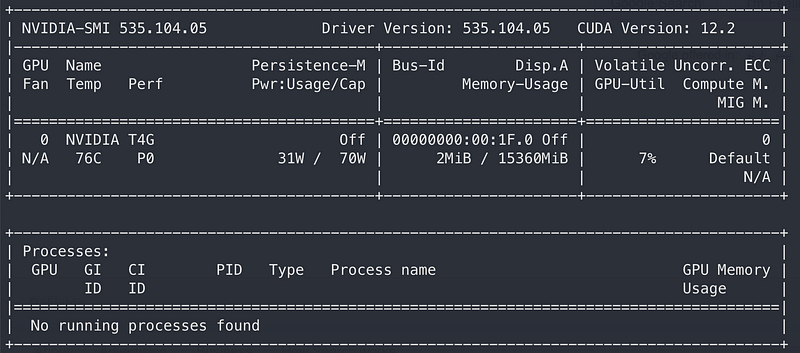
nvidia-smi — NVIDIA System Management Interface
The latest drivers for NVIDIA Tesla T4G can be found here by selecting the following options.
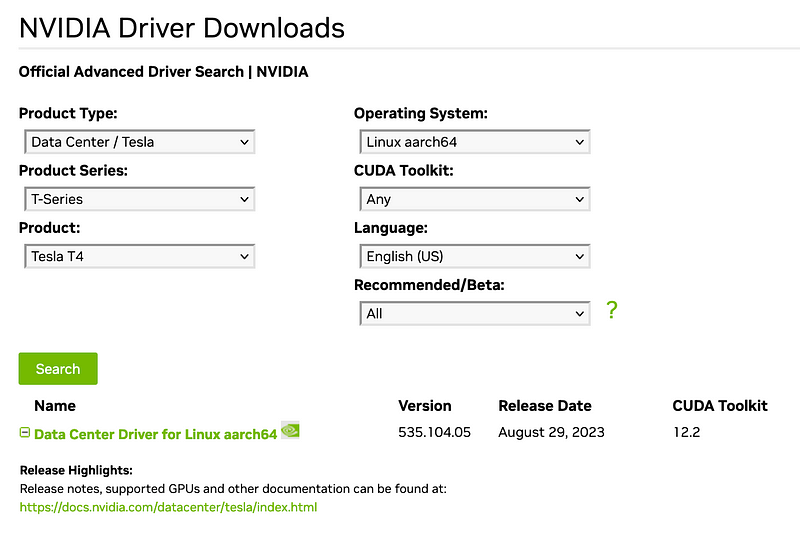
For guidance on selecting the correct driver, refer to the options above.
Install CUDA Toolkit
The next step involves downloading and installing the CUDA 12.2 toolkit. which can be done by running following bash commands
wget https://developer.download.nvidia.com/compute/cuda/12.2.2/local_installers/cuda_12.2.2_535.104.05_linux_sbsa.run
sh cuda_12.2.2_535.104.05_linux_sbsa.run --silent --override \
--toolkit --samples --toolkitpath=/usr/local/cuda-12.2 \
--samplespath=$CUDA_HOME --no-opengl-libs
To find the latest version, visit NVIDIA’s developer page and use the following selection.
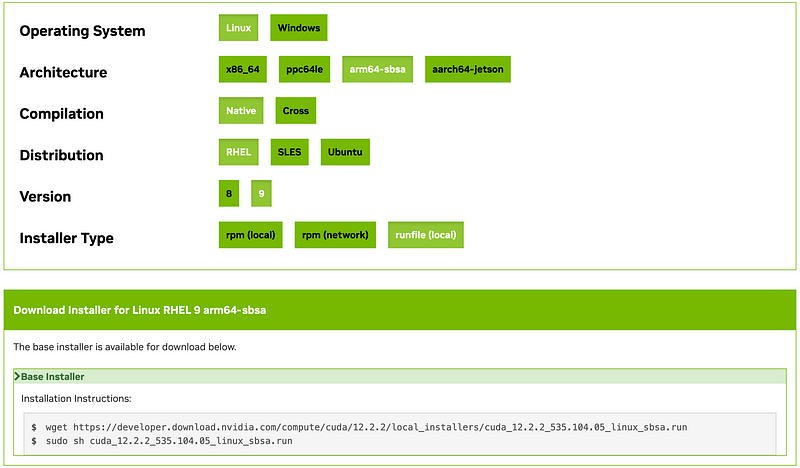
Follow the options above to choose the right CUDA Toolkit for your setup.
Install NVIDIA CUDA® Deep Neural Network library (cuDNN):
Lastly, we’ll install the CuDNN library for “Server Base System Architecture (SBSA)”.
wget https://developer.download.nvidia.com/compute/cudnn/redist/cudnn/linux-sbsa/cudnn-linux-sbsa-8.9.4.25_cuda12-archive.tar.xz
tar -xf cudnn-linux-sbsa-8.9.4.25_cuda12-archive.tar.xz
cp -P cudnn-linux-sbsa-8.9.4.25_cuda12-archive/include/* $CUDA_HOME/include/
cp -P cudnn-linux-sbsa-8.9.4.25_cuda12-archive/lib/* $CUDA_HOME/lib64/
chmod a+r $CUDA_HOME/lib64/*
Latest cuDNN can be downloaded from here.
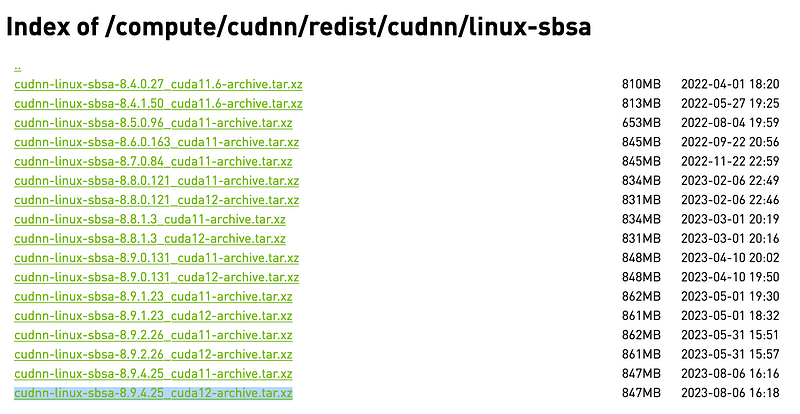
List of available cuDNN sbsa libraries for CUDA 11 and CUDA 12.
By combining all three, we will have the following function, which we will use in the final script as well.
setup_gpu() {
    wget https://us.download.nvidia.com/tesla/535.104.05/NVIDIA-Linux-aarch64-535.104.05.run
    sh NVIDIA-Linux-aarch64-535.104.05.run --disable-nouveau --silent

    wget https://developer.download.nvidia.com/compute/cuda/12.2.2/local_installers/cuda_12.2.2_535.104.05_linux_sbsa.run
    sh cuda_12.2.2_535.104.05_linux_sbsa.run --silent --override --toolkit --samples --toolkitpath=/usr/local/cuda-12.2 --samplespath=$CUDA_HOME --no-opengl-libs

    wget https://developer.download.nvidia.com/compute/cudnn/redist/cudnn/linux-sbsa/cudnn-linux-sbsa-8.9.4.25_cuda12-archive.tar.xz
    tar -xf cudnn-linux-sbsa-8.9.4.25_cuda12-archive.tar.xz
    cp -P cudnn-linux-sbsa-8.9.4.25_cuda12-archive/include/* $CUDA_HOME/include/
    cp -P cudnn-linux-sbsa-8.9.4.25_cuda12-archive/lib/* $CUDA_HOME/lib64/
    chmod a+r $CUDA_HOME/lib64/*
    ldconfig
}
4. Compiling and Installing CUDA 12.2 enabled PyTorch
Next we will compile and install PyTotch from source with the latest CUDA support for ARM-based ec2 instances, along with all the necessary Python packages.
# Download and install ccache for faster compilation
wget https://github.com/ccache/ccache/releases/download/v4.8.3/ccache-4.8.3.tar.xz
tar -xf ccache-4.8.3.tar.xz
pushd ccache-4.8.3
cmake .
make -j $CPUS
make install
popd
# Install NumPy, a dependency for PyTorch
dnf install -y numpy
# Install Python typing extensions for better type-checking
sudo -u ec2-user pip3 install typing-extensions
# Clone PyTorch repository and install from source
git clone --recursive https://github.com/pytorch/pytorch.git
pushd pytorch
python3 setup.py install
popd
# Refresh the dynamic linker run-time bindings
ldconfig
# Install additional Python libraries for PyTorch
sudo -u ec2-user pip3 install sympy filelock fsspec networkx
5. Test Your Installation
After you’ve gone through the installation process, you’ll want to ensure that PyTorch and CUDA are working as expected. Run the following command to test the setup.
python3 -c "import torch; print('Using device: ', torch.device('cuda' if torch.cuda.is_available() else 'cpu'))";
If the device returns ‘cuda,’ then congratulations, you’ve successfully installed PyTorch with latest CUDA support!
Complete script for effortless Setup 🪄

Ready for some magic? Before getting started, ensure that your AWS CLI is properly configured. If you haven’t done this, refer to the AWS documentation to get up to speed. You will also need to gather the IDs for your security group and subnet and the name of your key pair.
Once you have completed the necessary preparations, run the provided script. This will launch a g5g.4xlarge instance pre-loaded with user data, which initiates the installation process upon launch. The entire setup process should take approximately an hour to complete. However, you can monitor the progress as it goes. To begin, SSH into your newly launched instance.
ssh -i "your-key-pair.pem" ec2-user@your-instance-ip
Then, run the following command to monitor the installation in real-time:
tail -f /home/ec2-user/install.log
Complete script can be downloaded from Github and goes as follows.
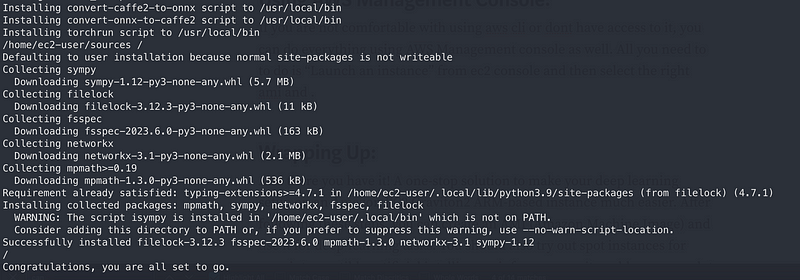
After everything is done you should get the following greetings.
Using AWS Management Console
You can also use AWS Management console for this process as well. All you need to to do is “Launch an instance” from ec2 console and then select the right AMI, Architecture and instance type, along with other networking and security configurations you will do for launching any other instance. Don’t forget to increase the volume size to 20 GB as well.
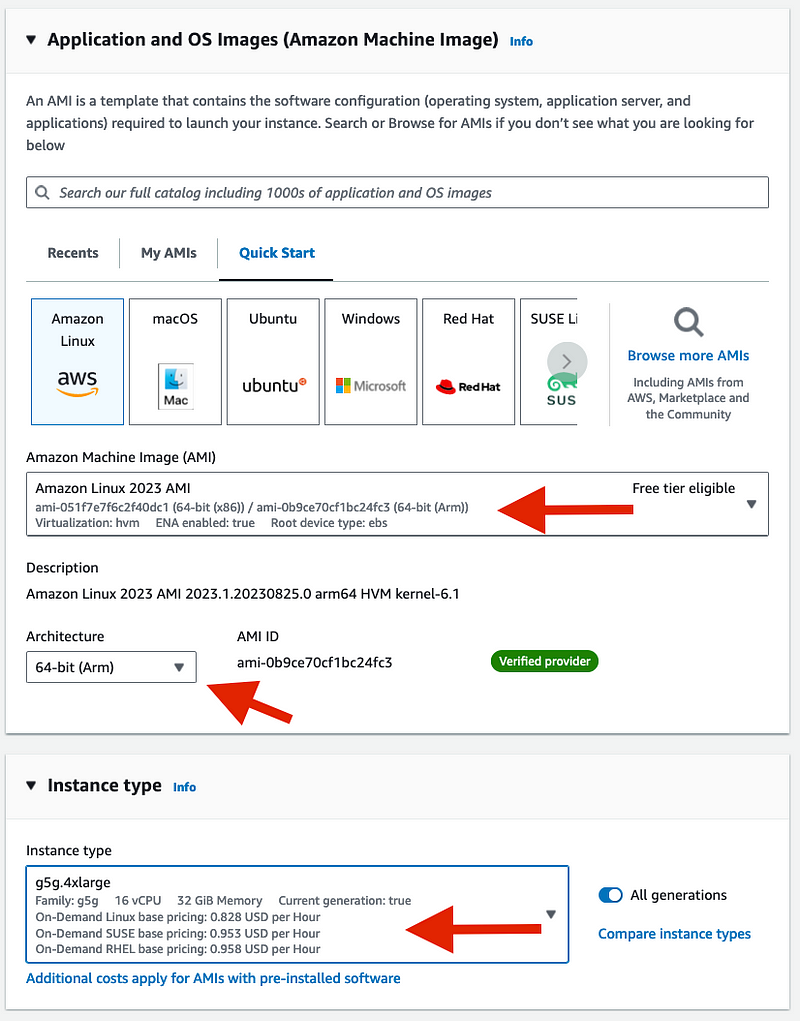

After selecting the right AMI, architecture, instance type, storage and other options, configure your instance’s User Data by adding custom setup commands that will run during launch.
To add User Data, go to the ‘Advanced Details’ section during the ‘Configure Instance’ stage, input the desired text or file, and paste the script from the GitHub repository between the ‘EOF’ markers into the User Data text area.
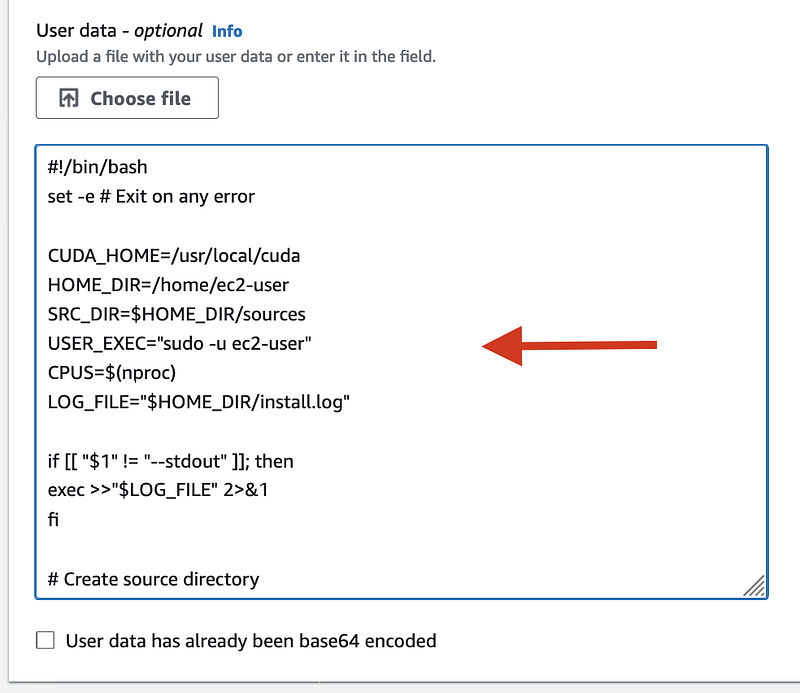
Remember, this User Data script is what automates your deep learning setup, so don’t skip this step!
Wrapping Up
And there you have it! A one-stop solution to make your deep learning setup on an Amazon EC2 Graviton2 ARM-based instance much easier. After following these steps, you can create an AMI (Amazon Machine Image) and use it for deep-learning tasks. You should also try out spot instances for your interruptible artificial intelligence inferences, as it could save you a lot on operational costs!
With this guide, we made configuration and setup hassle-free so you can dive straight into the work that matters most to you. If you find this script as helpful as we do, we would love to hear about the exciting projects it’s helping you accomplish. Feel free to share your success stories and any ingenious modifications you’ve made. Happy coding!
💡 Pro Tip: Max Power, Min Price — The G5G Magic Equation!
Did you know the g5g.xlarge, g5g.2xlarge, g5g.4xlarge and g5g.8xlarge have the same GPU power? If increasing the CPU power or adding more memory doesn’t significantly improve performance for your application, you can stick with the g5g.xlarge to save some money!
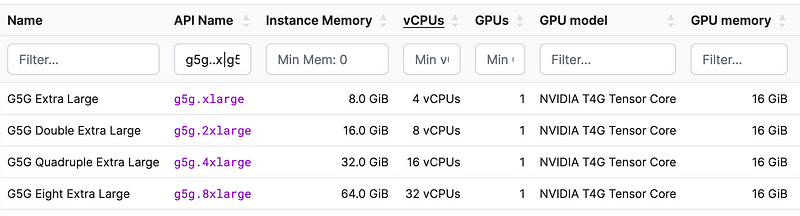
G5g Instance specification details.
About the Author and Our Journey at Jumpshare
I have been the part of tech industry for 18 years, serving different roles and devising different engineering solutions throughout. The ever-changing landscape of tech world and challenges it bring excites me, specially in the area of cloud computing and machine learning.
At Jumpshare, where I hold the position of VP of Engineering, we have successfully turned these challenges into opportunities. We’re passionate about implementing the techniques like this to make our machine learning inference tasks more cost-effective. By leveraging the power of AWS Graviton2 and NVIDIA Tensor T4G instances, we’ve been able to drastically reduce operational costs without compromising performance.
This guide is yet another effort to express our commitment of sharing our experience and insights with the community as we strongly believe in democratizing technology and saving costs on infrastructure can unlock doors to innovation.
We’re always open to hearing about your own experiences and improvements on the journey towards cost-effective, high-performance deep learning.
This article was originally published on Jumpshare.com
Resources
https://jumpshare.com/blog/deep-learning-on-aws-graviton2-nvidia-tensor-t4g-for-as-low-as-free-with-cuda-12-2/
https://www.nvidia.com/Download/Find.aspx
https://developer.nvidia.com/cuda-toolkit
https://developer.download.nvidia.com/compute/cudnn/redist/cudnn/linux-sbsa/
https://instances.vantage.sh/?selected=g5g..x|g5g.x
https://docs.aws.amazon.com/vpc/latest/userguide/security-groups.html
https://docs.aws.amazon.com/AWSEC2/latest/UserGuide/ec2-key-pairs.html
https://docs.aws.amazon.com/vpc/latest/userguide/configure-subnets.html
https://docs.aws.amazon.com/cli/latest/userguide/cli-chap-configure.html